No intros here. I’m assuming you’re here for the how to, not my unnecessary rambling to fill up space. Before we begin, just a few pre-requisites on my part: I am using a self-managed VPS with Debian 12 installed on an Apache server. Additionally, I am using ISPConfig 3 as my control panel. While ISPConfig is not required to use this guide, it will require some adjustments on your part in terms of how/when to create the database for your WordPress site.
Step 0: Prerequisites
The baseline for this guide assumes the following:
- You have a self managed VPS with an operating system already installed (Preferably Debian 11 or 12, but Ubuntu and earlier versions of Debian may work, but I don’t know for sure and haven’t tested them myself).
- ISPConfig 3 installed on your VPS as a control panel. This method will work for other control panels as well, but the steps for adding sites, creating users, and databases will be different.
- A web server, like Apache or Nginx installed on the VPS.
- A general level of comfort using SSH and FTP, no need to be an expert, but you should have some idea of what you’re doing.
Step 1: Log into your server via SSH
Open PuTTY or whatever SSH program you are using and log in as root. I know, I know, ‘root bad’, etc. but I like getting things done, and I’m assuming you are not a complete goofball if you are reading this guide, so just go with me on this and don’t mess anything up. If you want a proper and safe guide on how to do this, you can find plenty of convoluted guides with superfluous steps via a Google search.
Step 2: Update your server
Run this code to do your annoying but necessary updates. If you stay on top of your VPS with constant updates, feel free to skip this step.
apt update && apt upgrade -yStep 3: Set up the site
Using your ISPConfig 3 control panel, go ahead an add the domain you want to use under:
Sites >> Websites >> Website >> Add new website
Make sure to check all the boxes you need, and ensure the SSL and Let’s encrypt boxes are checked if ISPConfig is going to issue the certs. If you use an alternate DNS provider on top of ISPConfig, make sure there is an ‘A Record’ pointing that domain to the IP address of your server.
Step 4: Set up the database and user
While still using ISPConfig 3, go ahead and create a user and a strong password. Navigate to:
Sites >> Databases >> Database Users >> Add new user
Now we will create a new database for that domain, with the user you created above as the ‘Database user’.
Sites >> Databases >> Databases >> Add new Database
Check the ‘remote access’ box too, and make sure the ‘active’ box is checked.
Save the username and pass somewhere safe, as you will need this info later. My suggestion would be a secure password manager, or if you’re still living in the 90s, a good ‘ol Excel spreadsheet with all your usernames and passwords. Whatever works for you, this is an installation guide, not a security consult.
Also, this is probably a good time to mention that this guide is for informational purposes only and I cannot guarantee your outcome will be great. This is just what worked for me at the time of writing this, but things change on the internet all the time, so I am not responsible for total data loss, financial stuff, or whatever else you and your lawyer buddy want to blame me for. This guide is for my reference so I can look it up when I need to get things done, you are free to use it but for the love of good do not blame me if things don’t work out. There are thousands of other guides online you can check this information against. I promise not to deliberately add anything malicious, but low key, if you are reading this, I am probably only marginally more knowledgeable than you when it comes to this technical SSH stuff, so do your due diligence before blindly pasting code into your SSH from some page on the internet.
Step 5: Install WordPress
With ISPConfig, there is a default format for directory and file structures that I will be using. If you love making life unnecessarily difficult and changed your default schema, it’s on you to navigate your directories properly.
Assuming your website is named ‘example.com’, you first need to find the directory within the webroot of your domain. Using FileZilla or a similar program, you can see your web directory by pasting this into the ‘remote site’ section after login into your server:
/var/www/clients/client0
This should show you all of the domains currently hosted on your VPS that are managed by ISPConfig 3. Click on your site, in my case, ‘example.com’ and then click on the folder called ‘web’. Now, copy the address listed in the ‘Remote Site:’ bar. In my case it is:
/var/www/clients/client0/web6/web
It will look different for you, but the structure should be the same. Now, via SSH, enter the following code:
cd /var/www/clients/client0/web6/webRemember to replace the directory part after ‘cd’ with the actual path to where you want to install WordPress. This code will change the current working directory from your root directory to the specific web directory where WordPress will be installed.
Now instead of showing ‘root@server:~#‘ it should say ‘root@server: /var/www/clients/client0/web6/web#‘ or whatever your actual path is. Then, enter this code:
wget https://wordpress.org/latest.tar.gzThis will download the WordPress installation, now we will extract them by entering the following code:
tar xzf latest.tar.gzNow that the folder is extracted, let’s move it to the web root of this site, assuming you want the site to sit at ‘example.com’ and not ‘example.com/wordpress’. Enter this code:
mv wordpress/* .Now, we clean up some junk, i.e. removing the bulk download files. Enter this code:
rmdir wordpress
rm latest.tar.gz
Step 6: Adjust Permisions
For some reason, people forget this step too often, and it causes huge issues with writing/reading/executing, so this step involves changing the ownership of this web directory to your proper ISPConfig 3 issued user for this directory. Pay close attention here, as this is where many people mess up beyond recovery.
Remember that path you copied? Look for the number after ‘client’ and ‘web’. In my case, it was ‘client0’ (default for ISPConfig) and ‘web6’ (web folder for my specific site). You will want to change the owner and group for the web directory for your site, so enter the following code and adjust based on your client and web numbers listed on your actual path.
chown -R web6:client0 /var/www/clients/client0/web6/webNow, we just want to verify the permission levels for the files and folders are correct. They already should be, but it doesn’t hurt to verify. Enter this code:
find . -type d -exec chmod 755 {} \;
find . -type f -exec chmod 644 {} \;
Step 7: Configure WordPress
If you did everything right, and didn’t brutally mess up the steps above, your domain should point to the WordPress setup page. Simply open a web browser and navigate to your page, ‘example.com’ and the iconic WordPress logo should be present.
Follow the steps like selecting your language and other housekeeping stuff until you get to the page that shows you what you will need for installation. It should look like this:

Hopefully, you listened earlier and have those database user credentials ready to go. If not, go back to step 4, finish it, and come back here.
Click ‘Let’s Go’. You should see this screen:
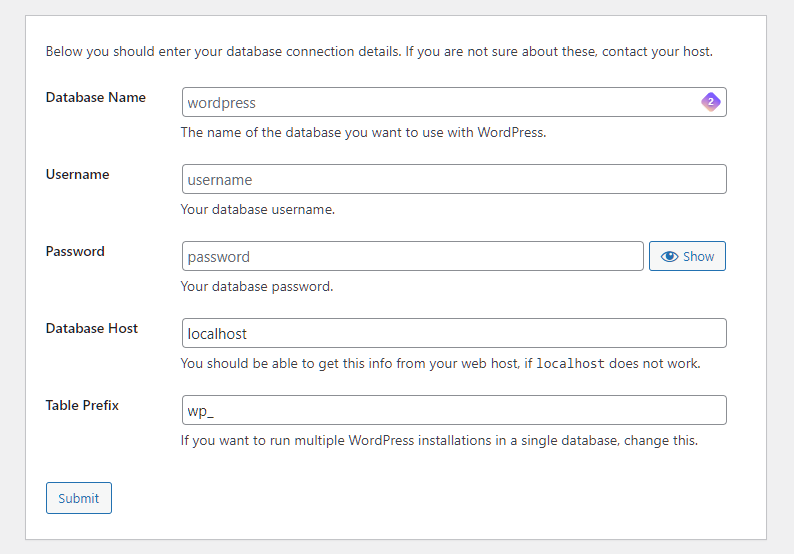
In the database name, enter the name of that database you created in step 4. Same with the Username and Password.
For the Database host, leave it as ‘localhost’ and change the Table Prefix if you want (you don’t have to). Then click ‘submit’. You should see this page if you entered everything correctly:
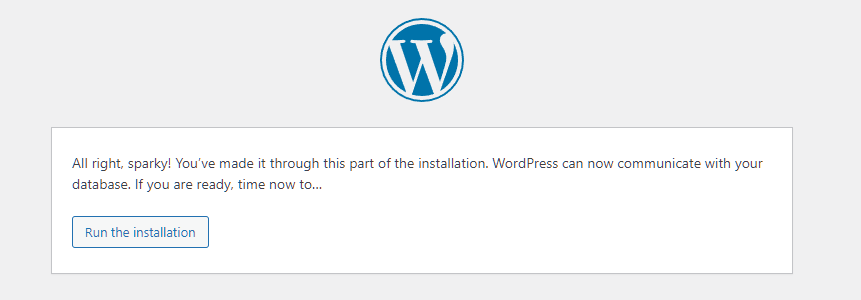
Click “Run the installation” and add all the basic info like site name, an admin username, password, and email. Remember, this is not the database info, you are creating a new Admin WordPress user, so save these credentials as well. Then click “Install WordPress.
If all goes well, you should see a ‘Success’ message.
Congratulations, your WordPress Site is now live. Now go and edit it to make it look pretty. Unfortunately, I don’t have a guide for that.
")
You want to say thanks?
The best way to thank me for this guide is to not complain about it. Seriously, I understand my methods are unorthodox, and do not follow ‘best practices’. I’m by no means an expert coder; like most senior developers, I’m just good at Googling stuff and breaking it down. This guide is not really for you anyway, just for me to reference later and to send to my AI minions to copy and replicate.