Why Use This Method?
Key Benefits:
| Benefit | Description |
|---|---|
| ⚡ Speed | Record one continuous video instead of hundreds of individual photos |
| 📸 Complete Coverage | Capture every detail in a single walkthrough pass |
| 🔧 Flexibility | Extract frames at any interval: 1fps, 3fps, or custom rates |
| 💰 Cost | 100% free using open-source FFmpeg – no licenses required |
⚠️ Important Note: This method extracts frames without blur detection. Motion blur will be present if the camera moves quickly. Best results come from steady cameras with good lighting.
What You’ll Need
1. FFmpeg Installation (5 minutes)
- Download FFmpeg from the official Windows builds:
- Go to: https://www.gyan.dev/ffmpeg/builds/
- Choose: “release essentials” (smaller) or “release full” (all features)
- Extract to
C:\ffmpeg
- Right-click the downloaded ZIP → Extract All
- Choose destination:
C:\ffmpeg
2. Frame Extractor Script Setup
Save this code as extract_frames.bat in C:\ffmpeg\bin
Create a new text file and save it with the .bat extension instead of .txt
@echo off
REM ===========================================
REM FFmpeg Frame Extractor v1.0 - Drag & Drop Tool
REM Place this .bat file in C:\ffmpeg\bin
REM Drag any video onto it to extract frames
REM ===========================================

:: Check if video was provided
if "%~1"=="" (
    echo Drag a video file onto this script to extract frames.
    pause
    exit /b
)

:: Ask for FPS rate (default: 1)
set /p fps="Enter frames per second to extract [default 1]: "
if "%fps%"=="" set fps=1

:: Ask for output format (default: jpg)
set /p ext="Enter image format (png, jpg, bmp, tif) [default jpg]: "
if "%ext%"=="" set ext=jpg

:: Ask if you want to resize
set /p resize="Resize? Enter WxH or leave blank (e.g., 1920x1080): "

:: Build filter string
if not "%resize%"=="" (
    set filter=fps=%fps%,scale=%resize%
) else (
    set filter=fps=%fps%
)

:: Run FFmpeg with optimized settings
ffmpeg -hide_banner -loglevel warning -stats ^
    -i "%~1" -vf %filter% -q:v 2 "%~dpn1_frame%%04d.%ext%"

echo.
echo ✅ Done! Frames saved in:
echo %~dp1
pause
How to Use It
Step-by-Step Process:
Step 1: Record Your HD Video
- Use a stable camera (phone, DSLR, action camera)
- Move slowly and steadily through the area
- Ensure good lighting (natural light preferred)
- Record in 1080p or higher for best results
Step 2: Transfer Video to Computer
- Save to an easy-to-access folder (e.g.,
C:\Videos) - Avoid special characters in filenames
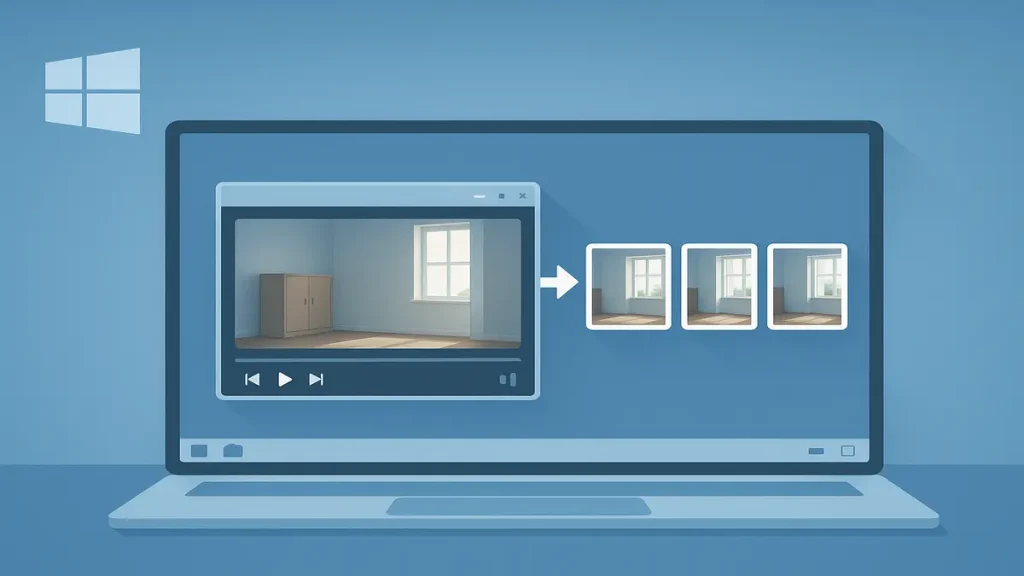
Step 3: Extract Frames
- Drag and drop your video file onto
extract_frames.bat - Enter settings when prompted: Prompt What to Enter Examples Frames per second How many stills per second
1= 1 image/sec3= 3 images/sec Image format Output file typejpg= smaller filespng= lossless quality Resize dimensions Optional scaling1920x1080or leave blank - Wait for processing (progress bar will show)
- Find your images in the same folder as the video
Expected Output:
inventory_video_frame0001.jpg
inventory_video_frame0002.jpg
inventory_video_frame0003.jpg
...
Best Practices for Clearer Stills
Camera Technique:
- ✅ Use a gimbal or stabilizer for smoothest footage
- ✅ Walk at half your normal speed to reduce motion blur
- ✅ Pause briefly at important subjects
- ✅ Film in landscape mode for standard photo dimensions
Optimal Settings:
| Video Length | Recommended FPS | Expected Output |
|---|---|---|
| 1 minute | 1 fps | ~60 images |
| 1 minute | 3 fps | ~180 images |
| 5 minutes | 1 fps | ~300 images |
Quality Tips:
- Lower FPS = Clearer images (less motion blur)
- JPG format for smaller files (5-10x smaller than PNG)
- PNG format for maximum quality (no compression)
Troubleshooting Common Issues
🔧 Issue #1: “ffmpeg is not recognized” Error
Quick Fix:
- Open Windows Search → type “Environment Variables“
- Click “Edit the system environment variables”
- Click Environment Variables → Find Path → Edit
- Add new entry:
C:\ffmpeg\bin - Restart Command Prompt and test:
ffmpeg -version
🔧 Issue #2: No Images Created
Checklist:
- ✓ Did you enter a valid FPS? (must be 1 or higher)
- ✓ Did you type a valid format? (
jpg,png,bmp, ortif) - ✓ Is the video in a writable folder? (not Program Files)
- ✓ For resize: use format
1920x1080(lowercase x, no spaces)
🔧 Issue #3: Blurry or Duplicate Frames
This is expected behavior – the script extracts frames at regular intervals without quality analysis.
Solutions:
- Use lower FPS (1-2 instead of 10)
- Record with better stabilization
- Delete unwanted frames manually after extraction
🔧 Issue #4: Script Window Closes Instantly
Common Causes:
- FFmpeg not installed correctly
- Video file in protected folder
- Special characters in file path
Fix: Move video to C:\Temp and try again
Quick Reference Card
Common Commands:
| Task | FPS | Format | Resize | Use Case |
|---|---|---|---|---|
| Quick survey | 1 | jpg | None | General documentation |
| Detailed capture | 3 | jpg | None | Inventory audit |
| High quality | 1 | png | None | Archival purposes |
| Web-ready | 1 | jpg | 1920×1080 | Online gallery |
| Thumbnail set | 0.5 | jpg | 800×600 | Preview images |
Frame Rate Guidelines:
- 0.5 fps = 1 frame every 2 seconds (minimal output)
- 1 fps = 1 frame per second (recommended default)
- 3 fps = 3 frames per second (detailed coverage)
- 10 fps = 10 frames per second (may have blur)
Storage Estimates:
| Video Length | 1 fps (JPG) | 3 fps (JPG) | 1 fps (PNG) |
|---|---|---|---|
| 1 minute | ~30 MB | ~90 MB | ~300 MB |
| 5 minutes | ~150 MB | ~450 MB | ~1.5 GB |
| 10 minutes | ~300 MB | ~900 MB | ~3 GB |
Advanced Tips
Batch Processing Multiple Videos:
Create batch_extract.bat:
@echo off
for %%f in (*.mp4 *.mov *.avi) do (
    ffmpeg -i "%%f" -vf fps=1 "%%~nf_frame%%04d.jpg"
)
Extract Specific Time Range:
ffmpeg -ss 00:01:00 -to 00:02:00 -i video.mp4 -vf fps=1 frame%%04d.jpg(Extracts frames from 1:00 to 2:00 only)
Add Timestamp to Frames:
ffmpeg -i video.mp4 -vf "fps=1,drawtext=text='%{pts\:hms}':fontsize=30:fontcolor=white:box=1:boxcolor=black" frame%%04d.jpgThis FFmpeg video-to-stills extraction method provides a fast, free solution for converting HD video walkthroughs into still images. While it doesn’t filter for quality, it’s perfect for rapid documentation where speed matters more than perfection.
Perfect for:
- Property management surveys
- Retail inventory documentation
- Construction progress tracking
- Insurance claim documentation
- Event photography backup
- Real estate virtual tours
Remember: The key to success is steady camera work and appropriate frame rate selection. Start with 1 fps and adjust based on your needs.